Monday, January 24, 2011

A Healthier Fettucini Alfredo

My one, huge weakness as a teenager and beyond was the decadence of Fettucini Alfredo. Give me creamy, pasta, some grilled chicken, and I was good to go. Sadly, this is not the best dish for you, especially as you get older and notice pasta on your thighs and belly the day after (not kidding). I rarely have it anymore, as it's not particularly healthful with it's all-out lack of vegetable nourishment.


I received organic artisan pasta by Naples Pasta Company from my sister-in-law as a Christmas gift this year (thanks Bridg! :) and had yet to make it. I chose to cook the Spinach Basil Garlic Fettucini and topped it off with Trader Joe's Alfredo Sauce. I like to add in grated Parmesianno Reggiano and cracked black pepper to the jarred sauce.


Enter my little tip for injecting almost any pasta dish with some much-needed greens: Add in a bag of spinach about 2 minutes before the end of the pasta cooking time. This wilts the spinach nicely and you can just drain it all at once.


The Result: A lovely bowl of pasta with greenness and goodness instead of just starch and cream.  The spinach has a nice bitter bite to accompany the creaminess of the alfredo sauce. This dish perfectly illustrates my approach to cooking. There's no reason to not have comfort staples, just think about what you can do to make it a more complete meal.  I've found that as I try new and different foods, my taste buds need more complexity. 


Spinach Fettucini Alfredo

Ingredients:

Artisan Pasta, preferably spinach, basil, or other vegetable base
1 jar prepared alfredo sauce
1 bag pre-washed spinach
Parmegiano Reggiano
S&P

Put alfredo sauce in a large sauce pan. Grate a good amount of Parmeggiano Reggiano over and add in S&P. Heat and stir over medium-low heat to combine.

Meanwhile, cook fettucini according to package directions, adding in entire bag of pasta in the last 2-3 minutes of cooking time. Drain all in a colander. 

Combine sauce with noodle/spinach mixture and enjoy!

Friday, January 7, 2011

Salsa Verde Enchiladas

After a long week with a nasty head cold, I'm ready for some good comfort food. And nothing means comfort to a Texan quite like Enchiladas. I may be a proponent for healthy eating, but don't kid yourself: every time I go home I have to have classic Tex-Mex cheese enchiladas. All the better if there's a margarita machine churning somewhere.

I haven't been brave enough to try the supposed Tex-Mex restaurants in Brooklyn. It could turn out like trying to find decent barbecue in the Northwest (don't even try). I've made them at home many times and have come extremely close to what you find in Mexican greasy spoons all over Texas.


 But tonight I wanted to try something different. I came across a recipe for Salsa Verde Enchiladas, which is basically Enchiladas Suizas. This is enchiladas filled with chicken and smothered with a green, tomatillo and sour cream based sauce instead of tomatoes.


The most important step when making any type of enchiladas is cooking the corn tortillas quickly in oil, or in this case, salsa verde and juice of one lime. The trick is to do it just enough, but not too much, otherwise they get too soggy and fall apart. This imparts flavor and texture into the tortillas and makes them easier to roll.


Use wax paper and roll filling into them, then place in your 9 X 13 casserole dish, all lined up like little soldiers. I'm weird, I know it.


Then sour cream and chicken broth are added to the salsa verde mixture, and poured over the top.
After baking for 15 minutes, you add tons of cheese to the top like I did. Because I like cheese, that's why.


And there you have it! Perfect enchilada dinner at home. I made some spanish rice for a side, but you could also have beans or a salad.

As always, enjoy.

Salsa Verde Enchiladas recipe at Good Housekeeping

Saturday, January 1, 2011

New Year's Potato Salad

Sometimes it's difficult to get through a 5 lb. bag of potatoes when there's only two people in the house, and you've already done mashed potatoes AND Kale and Potato Soup. I often have some laying around waiting to be thrown together into something special. This time: potato salad. Perfect and humble fare on a dreary New Year's day with nowhere to go. I know this is a dish you think of more in the summertime, but as a southerner, any time is a good occasion for potato salad!

My recipe is one that I made up over time, or just depending on my mood. There are a myriad of options when choosing your ingredients, but I keep it pretty classic. This is also a recipe where the flavor is dependent on the quality of ingredients, so buy organic if you can. You'll think me!


 It's best to prepare the salad at least an hour in advance to let all the flavors marry together.

Start by rinsing and boiling your potatoes of choice. I had about 2 lbs. of small Yukon Golds around, but most people like reds. Boil them to the point a fork can be inserted easily, but not falling apart and watery; about 15 minutes. Remember to salt the water!

At the same time, boil 2 eggs. Here is how to perfectly boil eggs. Put eggs in the fridge for 30 minutes while you let the potatoes cool. This makes both easier to work with.


While they are cooling, dice half a small red onion, a few stalks green onions and few sprigs dill. I love dill, so I tend to use a lot! Put them all in a large bowl and enjoy the pretty colors. Remember: the more colorful your food the better it is for you. Always strive for a veritable rainbow on your dinner plate.


De-shell cooled eggs and chop, along with potatoes. The size is, again, up to you. Add to bowl along with a large dollop of mayo, small dollop dijon mustard, a little relish, and a splash apple cider vinegar. Stir it all together and taste test. Doctor it up with salt and pepper or any other spices you feel it needs. Chill in the fridge at least an hour.


There you have it! I served this with thick slices of warmed Black Forest ham and sauteed broccolini with garlic butter I keep in the freezer. Enjoy!


My Classic Potato Salad

Ingredients: 

About 2 lbs. yukon gold potatoes, cleaned and cut in half
2 eggs
1/2 small red onion
few green onions
few sprigs fresh dill
mayo
dijon mustard
relish
apple cider vinegar
S&P as needed


Boil potatoes for 15 minutes in salted water. Boil eggs. Let both cool for about 30 minutes on counter or fridge. 

Meanwhile, dice up onions and dill. Add to a large bowl. 

De-shell and chop eggs and potatoes and add to bowl. 

Stir all together with a large dollop mayo, small dollop mustard, relish, and splash red wine vinegar. Add more as needed along with salt and pepper to taste. 

Let chill in fridge at least one hour. 


Monday, December 27, 2010

Snow and Soup for the First Time....

I realize there has been a pause here. I intended to document a number of things this holiday season, but instead just wanted to enjoy them and not worry about them becoming posts. That happens sometimes. You know, real life.

As many of you know, the Northeast was pounded Sunday with a crazy blizzard, causing us all to have a transit-free snow day. No better way to break in the southerner than blowing snow and up to 4 feet deep drifts (I'm also learning new terminology from the hubby; don't laugh at me people from the middle :)


Outside my window


The occasion called for the hearty and healthy kale and potato soup I had planned. I discovered a version of the recipe in the new Cooking with Trader Joe's Book, of which I have a small mention for my "Pico-de-Gallo salsa and avocado make a great instant guacamole" idea.


Anyway, this is an excellent way to take in warming liquids and kale that is ridiculously good for you. I added kielbasa to mine, just because.


It also gave me the perfect opportunity to use my handy new toy (thanks Don)


Here is the link to the recipe for Kale and Potatoe Soup

I also served this with my favorite new cream biscuits to keep around in the freezer for just such an occasion.


Wednesday, December 8, 2010

Keeping a Recipe Binder

I don't know about you, but I come across recipes I intend to try all the time. For a while, I was just bookmarking them or tearing out the pages, but all those ideas spread out in many different places just left me even more overwhelmed and confused. 


Being the ever-diligent organizer I am, I started a recipe binder and I highly recommend you do too. Whether you are just starting out and want to keep it all tidy, or are a seasoned pro and need multiple binders for your kitchen, a recipe binder is an indispensable addition to your arsenal. Mine sits alongside my cookbooks, getting overstuffed by the day! 


How to get started:


1. Pick any old binder, at least size 2"


2. Grab some dividers*, or make your own for the following sections (feel free to take your own liberties here, these are what I use):

  • Appetizers/Entertaining
  • Sides/Vegetable Dishes
  • Mains 
  • Breads
  • Desserts
  • Breakfast


My Mains tab will eventually become it's own binder with subdivisions like:

  • Meat
  • Casseroles/Piles O' Food
  • Healthy
  • Pasta/Salads


3. Get a pack of plastic page protectors (then say that three times fast)


4. Print out recipes from the internet or tear out from magazines that you want to try. Double them up in the page protector back to back to save space. 


*I have to say it's nice to have the dividers with pockets so you can slide in odd-sized resources, like the Food Network Magazine's 50_____s inserts.


It's especially helpful when you want to try a recipe, to be able to just take out the page instead of keeping an entire cookbook open on the counter. That way, if you liked it, it goes back in the binder, if not, leave it out and fill the space with a new one. In the end you are not committed to them, and the ones left will be your tried and trues that you know you enjoy. 


My Favorite Sources for Recipes:


Thursday, November 25, 2010

Thanksgiving for Two

As I hear about the overwhelming stress of cooking for Thanksgiving, and all the dishes and all the prep and blah, blah, blah, I'm truly thankful to have a quiet dinner at home with just me and the hubby. This has been our little tradition for a few years, since we live away from our families and often find ourselves alone on some holidays. But don't be sad for us! Sometimes it's just nice to bypass the traffic and hectic run-around and relax with all the comforts of this time of year. 

I'm going to confess something: I don't like turkey. I'll eat it, but when was the last time you really craved turkey? Besides a fried turkey leg that is...now that makes your mouth water. 

Anyway, I've taken to preparing little game hens. They're just so damn cute and easy to work with. I usually marinate them for at least 24 hours ahead of time in a variety of concoctions. This year it was decidedly simple being that my kitchen is, as you know, not fully stocked. 


The main components here are olive oil, red wine (a Cab Sav), soy sauce, crushed garlic and fresh sage and thyme. I just eyeballed it all into a bowl, but it's about equal parts of all the liquids, maybe a little more soy sauce. Excuse me if I'm not always that precise, this is cooking after all!

Rinse and pat the hens dry with paper towels. And then, and this is very important....


You must make them dance. This is why I say they are so much fun! Try making a turkey dance. Not fun.


Then lay them together in the glass bowl with  marinade and make sure they are all covered and cozy. Put plastic wrap over top and keep in the refrigerator, turning them a couple times before cooking. 


Here they are before the big roast ready to go. I've stuffed them with hunks of celery and onion, and trussed them. I realize this is not a proper roasting pan with a metal rack, but it works just fine. Maybe I'll get one for Christmas? :)


And voila! They look beautiful after an hour in a 400 degree oven. They're ready when you prick the leg and juices run clear. I also don't have a meat thermometer right now, so this is a good trick to know.


On to....Cornbread Stuffing

The reason I love Thanksgiving so much. I could eat just this for the rest of my life and not care too much. It wasn't until I moved out of Texas that I realized cornbread stuffing was a certain type and not the only one out there! It's a staple in every southern household and it should be in yours too. 

I'm just sayin'


I take a shortcut and make a batch of Trader Joe's cornbread the day before. It's sweet and moist enough. If you have the time and the propensity, go ahead and make it from scratch. I commend you. 

When it's cooled, I break it up into pieces and let it sit out overnight in the casserole to dry out, stirring them occasionally. 


The next day, before you start, toast the heals of a loaf of bread, then tear it into pieces and mix in with the cornbread. The reason I don't do this earlier is because I've found the moisture from the cornbread will just soak into the toast. The idea is that the toast is stickier and will help everything hold together, since cornbread is crumbly. 


Next chop up some fresh Sage and Thyme, and melt a stick of butter in a skillet. Cook the herbs a few minutes before adding in chopped onion and celery to make a yummy base for the stuffing. Cook a few minutes more until everything is soft and looks like this:


Then mix it all in with the bread...


Then add in 2 beaten eggs and enough chicken broth to just moisten it, you don't want it soupy. I believe it's close to a cup, but be the judge.


 Mix it all up and flatten the top


Cook at 350 degrees for 45 minutes and you should have something like this. 


Life is good. 

Happy Thanksgiving.


Full Menu: Roast Game Hens
               Cornbread Stuffing
               Green Bean Casserole
               Roasted Garlic Mashed Potatoes 

Monday, November 15, 2010

Survival Food: Lasagna

Moving into our first Brooklyn apartment hasn't been without it's share of ups and downs, alot of downs, mostly in the financial area. Just getting into a place can drain any and all assets you accumulate! 


In times like these when we are playing catch-up, there is not reason to eat depressing dinners (Ramen anyone?).   I made a vow to never feed us junk in place of something delicious and hearty, regardless of lack of funds. 


To remedy our temporary situation, I fell back on an absolute classic of lasagna. My method when cooking comfort food is to keep the savory attributes but insert some healthfulness as well. In this instance, I added spinach to the mix and made sure all ingredients were organic. 


I also began a habit of using a creamy Bechamel or white sauce instead of the traditional ricotta cheese. I saw Julia Child do this (yes, they are syndicating The French Chef on the Cooking Channel!) and immediately gave it a go. My father-in-law taught me how to make a white sauce with an emphasis on the science behind the process (he's a microbiologist), but I'm cutting it down to a simple explanation, and plan to do a more detailed post about this amazing base sauce at a later date. 


Simple Bechamel Instructions:


Start by melting 1 stick of butter (1/2 cup) on medium heat


You want to cook the butter a bit, but don't burn it! Swirl it around with a plastic whisk as you watch it bubble for a few minutes. Then, add in a little at at a time, 1/2 cup of white flour (always use equal parts fats and flour for sauces). The idea is to cook the flour in the butter a bit, so this is why you should go slowly, stirring almost constantly until...


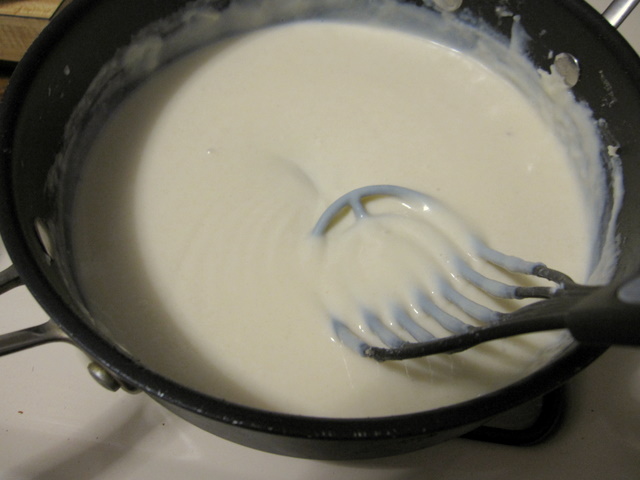
You get a creamy, yellowish base like this! Turn the heat down a bit, and start adding in about a cup of milk, again, a little at a time. It will hiss at you and you will get chunks, but don't worry, it will all turn out fine! Stir, stir, and stir some more as you work it into a velvety texture: 


Add more milk if it's a little thick. 


Here I added in some pressed garlic, shaved parmegiano reggiano, dried basil and oregano. 


So there is your simple tutorial to a lovely Bechamel. I use this as a base for so many things, like yellow curry (add curry powder at the end) or mac & cheese (add shredded cheeses at the end). 


Assembly


Before the Beschemel, I made a meat sauce by chopping and sauteing 1 yellow onion, then browning  italian sausage in the same pan. After draining off fat, I put in in a bowl with 1 jar of marinara. I also defrosted and drained 1 bag of organic frozen spinach. 


Layer in  a 9 X 13 casserole: a little meat sauce, no-boil lasagna noodles, 1/3 of meat sauce, 1/3 of Bechamel, 1/2 spinach, 


Then lots of shredded mozzerella and more grated parmegiano reggiano.
Repeat layers, ending with Bechamel and cheeses on top. Bake covered with foil for 30 minutes at 350 degrees. Take off foil and bake an additional 15 or 20 minutes until,


it's bubbling and looks like this! Let it sit for about 10 minutes before cutting into it. Any casserole is better if you let it settle before eating. 


Now I realize leftovers is a negative word to most households, and it used to be in my thinking as well! But when you take time once to create a dish of gooey goodness, you actually look forward to the subsequent meals you get from it. Many dishes are better the second or third time around, as some of you know (who really likes spaghetti on the first day?). 


Enjoy.


Spinach Lasagna with Bechamel


Bechamel Sauce: 


Ingredients:

  • 1 stick butter
  • 1/2 cup flour
  • 1 cup + more milk
  • Parmegiano Reggiano (about 4 tbls.)
  • dried oregano and basil
  • 1 clove garlic, pressed

Method: 


  Melt the stick of butter in a deep skillet on medium heat. After melted, cook and stir for a few minutes. Start adding in flour, a couple shakes at a time, while you continuously stir and incorporate the two together. When there is a nice yellow base, turn heat down just a bit, and start adding in milk a little at a time, while stirring constantly, until you get a velvety texture. Add in garlic, Parmegiano Regiano, oregano and basil. 


Lasagna


Ingredients:

  • 3 links pork italian sausage, casings removed
  • 1 15 oz. jar basic marinara sauce
  • 1 yellow onion, chopped
  • 1 16 oz bag frozen spinach
  • 9 no-boil lasagna noodles
  • 1 package shredded mozzerella

Method:
   
   Saute onion in  a deep skillet with extra virgin olive oil for about 5 minutes. Add in sausage and brown, breaking it up as you go. Drain fat. Put sausage mixture in a large bowl along with jar of marinara. Set aside. Defrost and drain frozen spinach*. Set aside. Make Beschamel. 

Assembly:

   In a 9 X13 in. casserole dish, layer a little meat sauce on the bottom (so it won't stick). Then put 3 noodles across, then 1/3 of meat mixture, 1/3 beschamel, 1/2 spinach, 1/3 mozzerella and some more shaved parmegiano regiano. Repeat layers. On 3rd layer, put only meat sauce, beschamel, cheeses. 

Cook covered with foil at 350 degrees for 30 minutes. Take off foil, bake an additional 15 to 20 minutes until it's bubbling. Let sit for 10 minutes. Enjoy now and later in the week!


*The best tip I have for draining spinach is to defrost it completely, then put into a cheesecloth and squeeze into a bowl or the sink a couple different times.